Copyright 2009 EATischler - New Horizons Golf Approach. All rights reserved.
| | | | | | |
To purchase a full color eBook
click on the PayPal button below.
Remember to provide email
address. ebooks are emailed
within 48 hours of purchase.
click on the PayPal button below.
Remember to provide email
address. ebooks are emailed
within 48 hours of purchase.

| Postural Release Biomechanics: Stand-Up, Post-Up, & Rotate-In options |
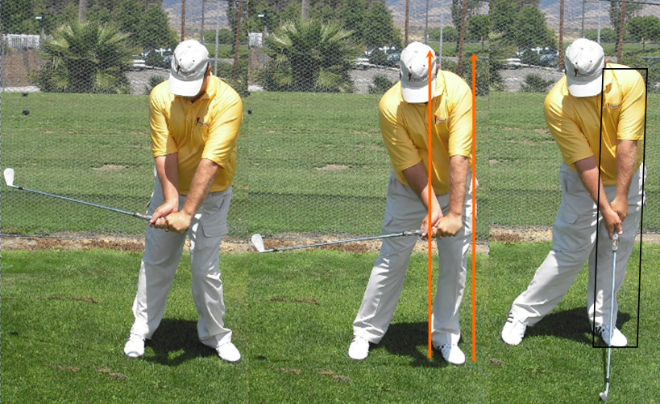
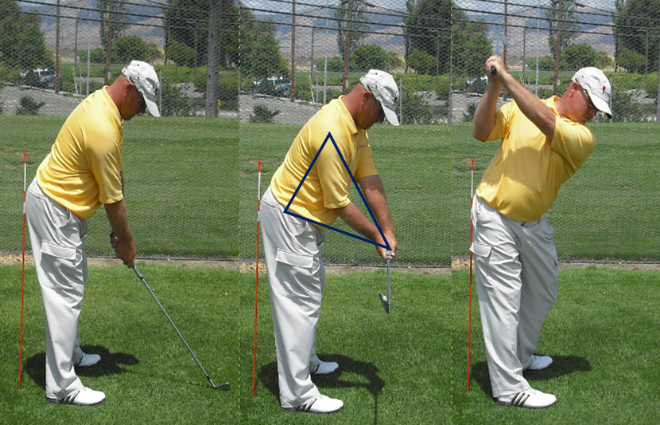
In the sequence to the left we see a golfer performing a backstroke that moves
deep (inside the line or around the golfer) with a moderate hinging of the wrists in
the takeaway. This produced a deep arc in the backstroke. In the down stroke the
arc is very similar. It is approaching form the inside and the blue line, marking the
distance from the sternum to the hands is nearly the same in the both down stroke
(far right picture) than it is in the backstroke (far left picture). If the pictures were
both taken with the left arm at exactly the same angle to the ground all three lines
would have approximately the same dimensions. We have added an additional
black line to show that the arcs of the clubhead paths are relatively the same.

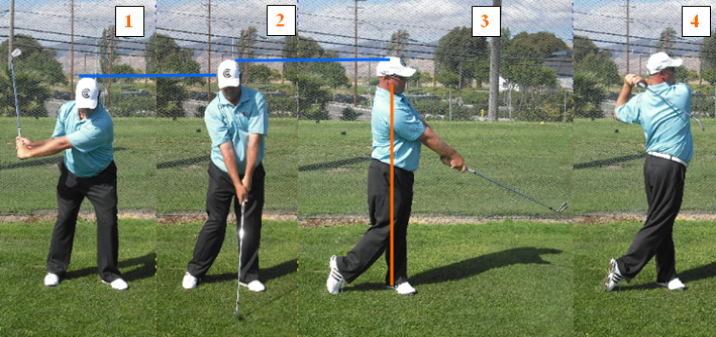
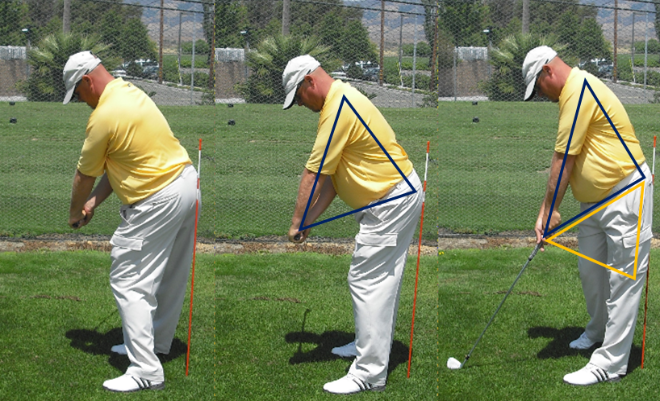
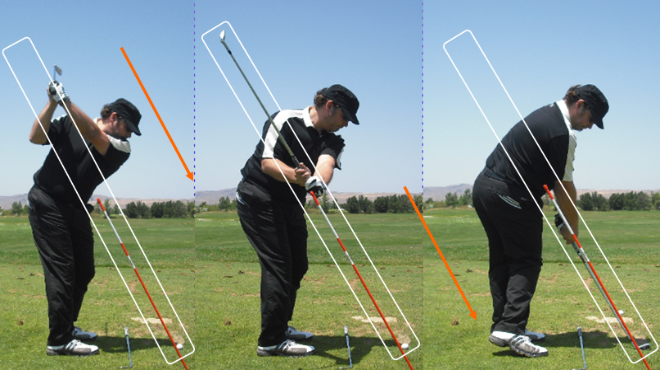
In the sequence aboe, notice how the golfer is standing up through impact (picture 2). From delivery
(1) through impact (2) we can see by the position of the head in relations to the blue line that the
golfer's posture is moving upward. This allows the golfer to maximize verticals through impact. Notice
how extended the arms and club are through impact. By the time the golfer turns to face the target
full postural release has been achieved, as marked by the vertical orange line (picture 3). Though
many people argue that this is improper posturing technique, the reality is that Stand-Up Postural
Release golfers rotate in posture through the transition. At the end of the transition the golfer's
rearend is restored back into its' starting position (picture 1). After the transition is completed the
golfer begins the stand-up process producing upward verticals that make room for the downward
verticals to extend. Maximizing and synchronizing these verticals in one of the options we have for
maximizing power. By synchronizing the verticals energy is accelerated and power is multiplied. As
the posture is released, it is released into a fully vertical and properly aligned posture (pictures 3 &
4). In the Stand-Up postural release option it simply happens earlier than is traditionally taught. In
this pattern the delivery process begins as the golfer begins to stand-up.
Though one of the primary concerns of developing a biomechanically sound swing action is rotating
in posture, we must also release our postural angles if we are to execute a biomechanically sound
swing. Releasing these angles allows a full release of the body's energy and it allows you to
normalize the stress the golf action puts on the body during the stroke.
in posture, we must also release our postural angles if we are to execute a biomechanically sound
swing. Releasing these angles allows a full release of the body's energy and it allows you to
normalize the stress the golf action puts on the body during the stroke.
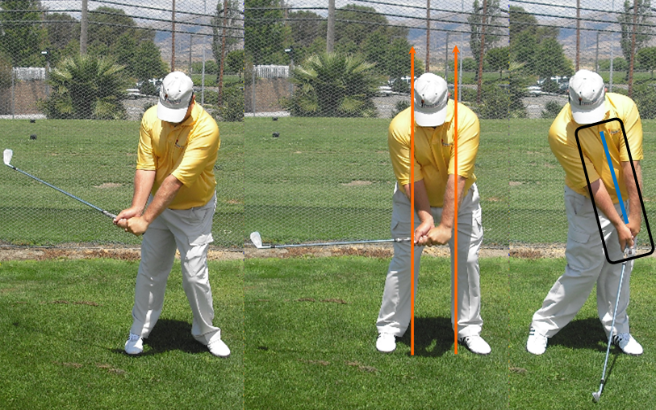
(far left picture) As EA's stroke continues to the
top of the backstroke his right arm folds
completing the levering action in the backstroke.
In EA's case this elevates the club into the
Mid-Track Top of the Backswing Plane. From the
top of the backstroke EA performs a
Plane-Slotting action. This action involves the
right shoulder rotating down the Shoulder-Plane
manner. Additionally the action is performed while
maintaining the Wrist Lever angle. For the player
owning Shoulder-Plane Slotting biomechanics,
the ideal top of the backstroke. Once the
Shoulder-Plane Slotting action is initiated all E.A.
needs to do is ride down through the
Shoulder-Plane Slot all the way through impact.
Notice how the stroke maintains Shoulder-Plane
Slotting integrity through impact.
| Cross-Slotting (Torso-Plane Slotting) Option: |
the Down-Slotting action so that the
clubshaft has returned to the
Hip-Plane Slot. In the middle picture
Sean has restored his posture and
wrist lever action back to the pre-set
wrist position. Once again it is
performed in the Hip-Plane Slot. (far
right picture) Sean has moved into
impact with his body rotating in
posture and his hands and the
clubshaft in the Hip-Plane Slot.
As the transition is executed the rear arm returns
alongside the body. Golfers often describe this process
as marrying the right arm to the right side of the body.
As the pivot restores the postural angles, the arms,
hands, and club return to their pre-set alignments. We
can see this happening in the picture far left. In the
middle picture the lead arm has once again aligned itself
with the front side of the body. The wrist lever action is
being maintained as the stroke moves into delivery while
achieving rear linkage alignments. Once again the wrist
lever angle is maintained. If the Rear Linkage golfer is
flexible enough to leaves his, or her, arms behind the
body as the pivot moves forward he or she may still
experience the feeling of being stuck. However, this is
much less common in the case of Rear Linkage golfers.
They are more likely to simply rotate forward while
leaving the right arm in place where it can become
married to the side of the body. (Far right picture) As
the stroke moves further into delivery, notice how the
right side is driving through and the right arm and
clubshaft are aligned exactly on the Rear Linkage mark.
In the picture far left above the set-up has been
established with the tailbone up against the
orange stick, simulating that it is up against the
wall. In the middle picture the pre-set wrist
position is established on the centerline of the
body. (Far right) The stroke moves to the top of
the backstroke.
established with the tailbone up against the
orange stick, simulating that it is up against the
wall. In the middle picture the pre-set wrist
position is established on the centerline of the
body. (Far right) The stroke moves to the top of
the backstroke.
If you have any questions regarding New Horizons Golf Approach please contact EA Tischler at (408)203-7599, or email your questions to EA Tischler newhorizonsgolfer@yahoo.com. |
| New Horizons Golf Approach I n n o v a t i v e C o a c h i n g F o r G o l f e r s |
| Swing Linkage (Impact Linkage) Biomechanics: Front, Center, & Rear options |
As we begin our study of the biomechanics related to good feel we will start with the feature of Impact Linkage. Impact Linkage is a very important influence
when it comes to ensuring proper timing. To understand why this is, we will describe the concept of linkage first. Linkage is the ability to geometrically align
your arm swing with your pivot action. In order for all the components of your stroke to deliver the stroke's energy in one united action, they must all be linked
together. Linking all the components together allows all the stroke's energy to multiply, gather, and be delivered together.
In the New Horizons Golf Approach Linkage is an expanded version of connection. If you've studied either the Stage One - Your Fundamentals web pages or
the Stage Two - Your Techniques web pages your may remember studying the basic techniques of connecting your arm swing to your body motion. If you
have studied the basic connection techniques you may ask, "What's the difference between connection and linkage?" The easiest way to differentiate
between the two is that connection is the way the arm swing aligns with the body during the first half of the downswing and up to delivery. That process of
connection we also call "delivery linkage." Impact Linkage is the alignment of the arms in relations to the body as well as who the rest of the body is aligned to
support the delivery action through impact. For example, a right handed golfer using the Rear Delivery Linkage will marry the right arm to the right side during
the downswing. As far as Rear Impact Linkage is concerned, every component of the right side moves through the delivery interval in a synchronized manner.
Right foot, knee, hip, side of the torso, shoulder elbow, hands and club are all moving through delivery together in one continuous synchronized manner. Now,
it would be nice and clean if it was always the case that Rear Delivery Linkage golfers always use Rear Impact Linkage, however that isn't the case. In fact any
of the Delivery Linkage alignments can be matched up with any of the Impact Linkage alignments. Basically, the Delivery Linkage alignment (or Connection
alignment) simply matches the Trail Arm Action. By that I mean that On-top golfers will use and elbow back connection alignment (or what we call a Rear
Delivery Linkage alignment), Side-On golfers use a marry the right arm to the right side connection technique (or what we call Center Delivery Linkage), and
Under golfers will use a tucked in-front elbow position for connection (or what we call Front Delivery Linkage).
One of the key things to remember about linkage is that it must match your clearing pattern. If you use Front Hip Clearing then you must use Front Linkage to
ensure a biomechanically sound stroke. If you use Tailbone Clearing then you must use Center Linkage to ensure a biomechanically sound stroke. If you use
Rear Hip Linkage then you must use Rear Linkage to ensure a biomechanically sound stroke. In order for all the forces of the stroke to be delivered down the
line together, they all need to be oriented in the same direction. If your arm swing links up to your body motion on a different mark than the one that creates
clearing the delivery of the arm swing will be thrown out of alignment with the force vectors of the pivot action. If the arm swing links up with the pivot action on
the mark with the clearing action, all the components of the body will be delivered down the same plane line. In summary, matching your linkage to your
clearing feature ensures all the forces of your stroke will be working together in a synchronized manner.
| Front Impact Linkage Option: |
To help visualize and understand how linkage works we are going to study it in terms of using a pre-set wrist drill.
Whenever you use a pre-set wrist drill you want to make sure your set the wrists on the Linkage Line. You also want
to make sure you assemble your delivery point on the linkage line.
Whenever you use a pre-set wrist drill you want to make sure your set the wrists on the Linkage Line. You also want
to make sure you assemble your delivery point on the linkage line.
To perform the Front Linkage pre-set wrist drill, you
begin by perform the Wrist Lever Option that fits your
you will align your lead arm in-line with the front side
of your body. In the middle picture above you can
see that the pre-set wrist action has been performed
by aligning the left arm in-line with the left side of the
body. This is the proper Front Linkage alignment for
a right handed golfer. Once the preset is completed
you simply move to the top of your backstroke.
As the transition is executed the lead arm needs to move in
front of the body back toward the front linkage alignment
mark. Golfers often describe this process as waiting for
the arms to match up to the body. By this they mean the
body is waiting for the arms to link up. Though the
perception is the body is staying back as the arms catch
up, in reality the body is restoring as the arms are catching
up to link up. We can see this happening in the picture
far left. Instead of the body out racing the arms, we can
see the arms moving in front of the body in an effort to link
up to the Front Linkage mark. In the middle picture the
lead arm has once again aligned itself with the front side of
the body. The wrist lever action is being maintained as the
stroke moves into delivery while achieving front linkage
alignments. If a Front Linkage golfer leaves his, or her,
arms behind the body as the pivot moves forward he or
she will most likely experience the feeling of being stuck. It
will become obvious that Front Linkage golfer really have
to wait for the transitional move to be completed, much
more than even Center Linkage golfers.(Far right picture)
As the stroke moves further into delivery, notice how the
lead arm and clubshaft are aligned exactly on the Front
Linkage mark.
In the picture far left we can see the set-up has been
established with the front hip up against the orange
stick, simulating that it is up against the wall. In the
middle picture we can see the pre-set wrist position.
Notice how the lead arm, torso, and upper leg all
seem to be lined up as if they are also up against a
wall. It is clear the pre-set position is more front than
either center or rear. (Far right) The stroke moves to
the top of the backstroke.
(Far left) As the stroke transitions forward the lead
arm moves more in front of the body. It is moving
toward the Front Linkage mark as the body is
moving to restore its' posture. In the middle picture
the front hip has cleared back up against the
orange stick and the lead arm has linked up to the
Front Linkage alignment mark. (Far right) As the
swing continues into impact the front hip is fully
cleared and the front leg, torso, arm, and clubshaft
are all aligned on the mark.
| Center Impact Linkage Option: |
To help visualize and understand how linkage works we are going to study it in terms of using a pre-set wrist
drill. Whenever you use a pre-set wrist drill you want to make sure your set the wrists on the Linkage Line. You
also want to make sure you assemble your delivery point on the linkage line.
drill. Whenever you use a pre-set wrist drill you want to make sure your set the wrists on the Linkage Line. You
also want to make sure you assemble your delivery point on the linkage line.
To perform the Center Linkage pre-set wrist drill,
you begin by perform the Wrist Lever Option that
fits your biomechanics. As you perform the Wrist
Lever action you will align the center of your hands
on the center line of your body. In the middle
picture above you can see that the pre-set wrist
action has been performed by aligning the center of
the hands exactly on the center line of the body.
This is the proper Center Linkage alignment for a
right handed golfer. Once the preset is completed
you simply move to the top of your backstroke.
As the transition is executed the hands need to
move in front of the body back toward the center
linkage alignment mark. Golfers often describe this
process as waiting for the arms to match up to the
body. By this they mean the body is waiting for the
arms to link up. Though the perception is the body
is staying back as the arms catch up, in reality the
body is restoring as the arms are catching up to
linkage point. We can see this happening in the
picture far left. Instead of the body out racing the
arms, we can see the arms moving in front of the
body in an effort to link up to the Center Linkage
mark. In the middle picture the hands have once
again aligned with the center line of the body. The
wrist lever action is being maintained as the stroke
moves into delivery while achieving center linkage
alignments. If a Center Linkage golfer leaves his,
or her, arms behind the body as the pivot moves
forward he or she will most likely experience the
feeling of being stuck. Tiger Woods has often
described this experience. I believe he describes
this experience because he owns Center Linkage
biomechanics. (Far right picture) As the stroke
moves further into delivery, notice how the hands
stay exactly on the center line of the body as the
stroke moves into impact.
(Far left) As the stroke transitions forward the hands
move in front of the body. They are moving toward
the Center Linkage mark as the body is moving to
restore its' posture. In the middle picture the tailbone
has cleared back up against the orange stick and the
hands have linked up to the Center Linkage
alignment mark. (Far right) As the swing continues
into impact, the tailbone is fully cleared and the hands
remain aligned on the center line of the body.
| Rear Impact Linkage Option: |
To help visualize and understand how linkage works we are going to study it in terms of using a pre-set wrist
drill. Whenever you use a pre-set wrist drill you want to make sure your set the wrists on the Linkage Line. You
also want to make sure you assemble your delivery point on the linkage line..
drill. Whenever you use a pre-set wrist drill you want to make sure your set the wrists on the Linkage Line. You
also want to make sure you assemble your delivery point on the linkage line..
To perform the RearLinkage pre-set wrist drill, you
begin by perform the Wrist Lever Option that fits
your biomechanics. As you perform the Wrist Lever
action you will align your rear arm in-line with your
rear leg. In the middle picture above you can see
that the pre-set wrist action has been performed by
aligning the right arm in-line with the right leg. This
is the proper Rear Linkage alignment for a right
handed golfer. Once the preset is completed you
simply move to the top of your backstroke.
As the transition is executed the rear arm stays
connected to the rear side of the body. Depending
on the top-set alignment, the arm may need to
move slightly to make sure it is married to the side
of the body. Rear Linkage golfers often report
rotating from the top of the backstroke while leaving
the arms behind. This was Ben Hogan's
description, showing he was a rear linkage golfer.
If you are extremely flexible you may still be able to
leave your arms behind your body and end up
feeling stuck. In the middle picture the rear arm
has linked up with the rear side of the body. The
hands are directly in front of the rear pocket, and
the wrist lever angle is being maintained. (Far right
picture) As the stroke moves further into delivery,
notice how the whole right side seems to be moving
into impact together. Right arm is married to the
right side, the right knee is moving into alignment
with the clubshaft and the hands are still aligned in
front of the pocket. These are exactly the
conditions needed to deliver the swing with Rear
Linkage alignments.
In the picture far left above we can see the set-up
has been established with the rear hip up against
the orange stick, simulating that it is up against the
wall. In the middle picture we can see the pre-set
wrist position. Notice how the rear arm, torso, and
upper leg all seem to be lined up as if they are also
up against a wall. (Far right) The stroke moves to
the top of the backstroke.
| Swing Slotting (Delivery Plane) Biomechanics: Down Slotting (Hip-Plane Slot), Cross Slotting (Torso-Plane Slot), & Plane Slotting (Shoulder-Plane Slot) options |
To understand the concept of slotting better we will observe three different golfers performing three different training exercises.
As you view these patterns, keep in mind that golfers whom own Down-Slotting biomechanics deliver their swings on the
Hip-Plane Slot. This is the plane that is aligned from the ball line up through the golfer's pelvis. Technically the Hip-Plane Slot
Zone is a coned area from the ball up through the bottom of the tailbone along the lower end of the zone and from the ball up
through the navel along the upper part of the zone. Golfers whom own Cross-Slotting biomechanics deliver their swings in the
Torso-Plane Zone. This is the plane that is aligned from the ball line up through the golfer's torso. Technically the Torso-Plane
Slot Zone is a coned area from the ball up through the navel along the lower end of the zone and up through the bottom of the
sternum along the upper end of the zone. Golfers whom own Plane-Slotting biomechanics deliver their swings in the
Shoulder-Plane Zone. This is the plane that is aligned from the ball line up through the center of the golfer's shoulder girdle.
Technically the Shoulder-Plane Slot Zone is a coned area from the ball up through the bottom of the sternum along the lower end
of the zone and up through the top of the shoulder girdle along the top part of the zone.
In the middle picture (left) Sean has
pre-set his wrist lever action so that
his hands and club shaft are exactly
on plane. From this pre-set position
Sean simply rotates in posture
ensuring that the first half of the
backstroke is performed inside the
Hip-Plane Slot Zone.
pre-set his wrist lever action so that
his hands and club shaft are exactly
on plane. From this pre-set position
Sean simply rotates in posture
ensuring that the first half of the
backstroke is performed inside the
Hip-Plane Slot Zone.
| Down-Slotting (Hip-Plane Slotting) Option: |
As Sean's stroke continues to the top of
the backstroke his right arm folds
completing the levering action in the
backstroke. In Sean's case this elevates
the club into the Mid-Track Top of the
Backstroke alignment. From the top of
the backstroke Sean performs a
down-slotting action. That action involves
his right forearm and hands returning to
the Hip-Plane Slot while maintaining his
Wrist Lever angle. Once the right forearm
has returned to the Hip-Plane Slot he will
restore his posture and hands to the
pre-set wrist position. Then he will
deliver the stroke through impact in the
Hip-Plane Slot.
(Left) We can view Sean's training
exercise from the target view. In this
pattern I will skip the address position
and add in the picture below where
Sean returns to the restored pre-set
wrist position. (far left picture) Sean
has pre-set his wrist lever action to be
aligned on-plane. In the middle picture
Sean is rotating in posture while the
stroke remains on the Hip-Plane Slot.
(far right picture) Sean folds his right
arm completing the backstroke lever
action. He is now ready to down-slot
(far left picture) Paul has addressed the
ball with the clubshaft positioned in the
Hip-Plane. The orange stick is positioned
to simulate Paul's Torso Plane. In the
middle picture Paul has performed his
pre-set lever wrist action. He uses a
version of the Diagonal Lever action. His
version sets the clubshaft outside the
plane line, however his rotation brings it
back on-plane. (far right picture) We can
see Paul has rotated in posture and in
doing so the clubshaft has been aligned
in the Torso-Plane Slot.
(far left picture) As Paul's stroke continues to
the top of the backstroke his right arm folds
completing the levering action in the
backstroke. In Paul's case this elevates the club
into the Mid-Track Swing-Track. From the top of
the backstroke Paul performs a cross-slotting
action. This action involves his hands moving
across his torso onto the Torso-Plane Slot while
maintaining his Wrist Lever angle. Paul's hands
are very close to being exactly on the Torso
Plane at the top of the backstroke. Close
enough to be biomechanically sound. Keep in
mind that achieving ideal alignments are
dependent on having ideal physical
conditioning. Something most of us struggle
with being able to maintain in our lives. Once
the Cross-Slotting action is initiated all Paul
needs to do is ride the Torso-Plane Slot down
through impact. Notice how the stroke
maintains Torso Plane integrity through impact.
| Cutting-The-Plane (Shoulder-Plane Slotting) Option: |
Below we can study the training pattern of a golfer that delivers his stroke in the Hip-Plane
Slot. The Hip-Plane is designated by the orange alignment stick stuck in the ground at an
inclined angle during training. In pictures there is along and white rectangular box overlay
tilted to simulate the Hip-Plane Slot Zone.
Slot. The Hip-Plane is designated by the orange alignment stick stuck in the ground at an
inclined angle during training. In pictures there is along and white rectangular box overlay
tilted to simulate the Hip-Plane Slot Zone.
Below we can study the training pattern of a golfer that delivers his stroke on the Torso Plane. The Torso Plane is
from the ball line slightly so that it is aligned with the golf shaft which is a few inches inside the ball line at address.
Some day we may see golfers that deliver the stroke on the Torso Plane actually address the ball with the golf shaft
on the Torso Plane. Moe Norman is a golfer that has done so.
Below we can study the training pattern of a golfer that delivers his stroke in the Shoulder-Plane Slot. The Shoulder-Plane Slot
is marked by the orange shaft angled from the ball line up through the center of the shoulder girdle. The orange shaft is off-set
from the ball line slightly so that it is aligned with the golf shaft which is a few inches inside the ball line at address. Some day
we may see golfers that deliver the stroke on the Shoulder-Plane Slot actually address the ball with the golf shaft in the
Shoulder-Plane Slot. As a matter of fact EA Tischler already has students that use such alignments. Below EA demonstrates
the pattern with a more traditional single shift into the Shoulder-Plane Slot from a more traditional address position.
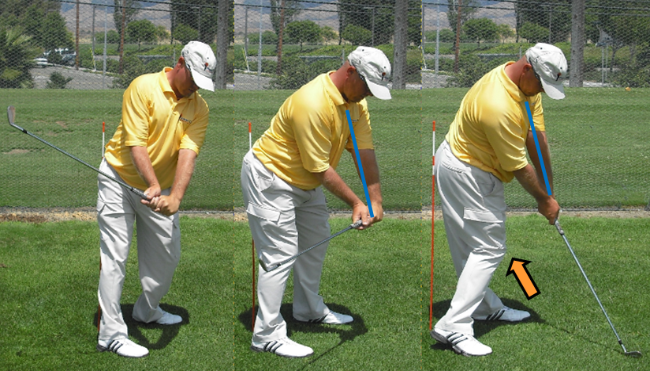
(far left picture) EA sets up in a fairly
traditional address position. In the middle
picture he pre-sets his wrist lever action while
positioning it into the Shoulder-Plane Slot.
(far right picture) Once the stroke is pre-set in
the plane zone he simply rotates in posture
until the left arm is parallel to the ground. At
this point the clubshaft is still aligned in the
Shoulder-Plane Slot.
(far left picture) This is an example of a
golfer that owns Shoulder-Plane Slotting
biomechanics and addresses the ball with
the clubshaft establishing the
Shoulder-Plane Zpne alignment. As we
can see he also sets his wrist lever action
in the Shoulder-Plane Zone in the middle
picture above. (far right picture) At the
top of the backstroke his hands set in the
Shoulder-Plane Zone.

(far left picture) As the stroke
transitions back toward the restored
delivery position, once again still in the
Shoulder-Plane Zone. In the middle
picture the stroke reaches impact with
the shoulder plane alignments being
maintained.
transitions back toward the restored
delivery position, once again still in the
Shoulder-Plane Zone. In the middle
picture the stroke reaches impact with
the shoulder plane alignments being
maintained.
| Stand-Up Postural Release Option: |
| Post-Up Postural Release Option: |
| Rotate-In Postural Release Option: |
As we study the Rotate-In Postural Release Option from the down the line view we can see the golfer rotating in
posture until the full extension in Picture (3). Once the full extension is achieved the golfer releases all postural
angles up to a tall finish. This option is easy to visualize and it is so often professed as the only correct option
that it needs little discussion. The point to remember is that it is only suited to one-third of the golfing population.
One-third of you are built to own the Stand-Up option and one-third of you are built to own the Post-Up option.
The Stand-Up Postural Release option is largely misunderstood. Golfers that have On-Top Trail Arm Actions extend downward
a such a vertical angle that they need to make more room in the vertical direction, and the Stand-Up Postural Release option
helps them make enough room for the Covering Lever Delivery action they perform.
a such a vertical angle that they need to make more room in the vertical direction, and the Stand-Up Postural Release option
helps them make enough room for the Covering Lever Delivery action they perform.
| Arc Management Biomechanics: Narrow-Wide, Deep-Deep, & Wide-Narrow options |

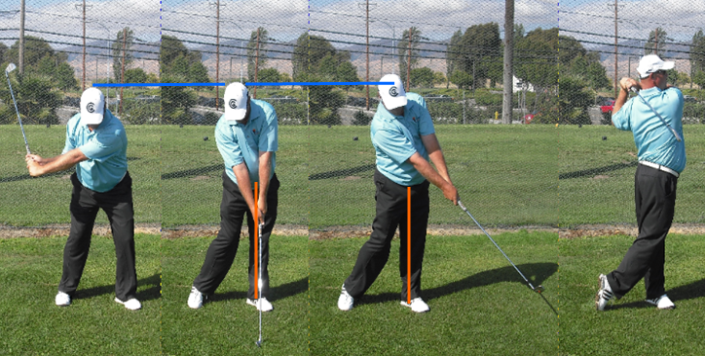
From the down the line view we can see the golfer transition in posture (picture 1). When the transition
is completed the golfer begins the stand-up postural release action. As the stand-up action begins the
downward verticals begin to kick in. By the time the stroke reaches impact the posture is stretching up
vertically and the arms and club are stretching downward vertically (picture 2). We can see the posture
is stretching up vertically as the golfer has come out of the posture marked by the orange lines. In
picture (2) we can see the yellow line indicating the golfer's adjusted posture. We can also see how
much the head has risen as marked by the blue lines. In picture (3) we can see the posture is
continuing to move in t he vertical direction. By the time the golfer reaches the full follow-through, the
posture is fully vertical.

In the sequence to the left we can see the stroke transition in posture. Then as the stroke moves from
delivery (1) into impact (2) and just beyond (3) the posture is standing up. In this golfer's case he delivers
the swing on the Center of Gravity Plane and therefore his stand-up progresses a little later than the one
demonstrated in the above two sequences. This is evident in the fact that his rearend stays back in the
restored position until the club moves through impact. From picture (3) to the full follow-through he
releases his posture freely as he finishes off the stand-up action. Once this golfer began releasing his
posture with the stand-up option he gained both power and accuracy.
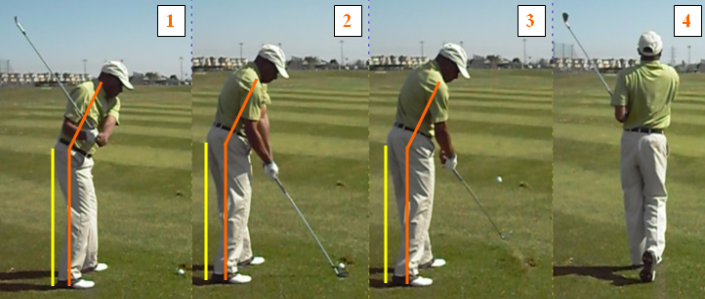
In the Post-Up option the golfer will transition in posture, maintain the posture into delivery (1) and then
begin posting up on the front leg. As the golfer posts up on the front leg the stroke begins to extend
through the ball (2) out to the full extension point (3). Once the leg reaches the full post the sternum and
head begin to release upward. This is happening in picture (2) as we can see the head raising a little in
relations to the blue line. As the swing moves into the full extension the posture releases more, as evident
in the head moving upward above the blue line in picture (3). Notice how the orange line in pictures (2) &
(3) indicate the vertical attitude of the posting action. From the full extension the postural release action
releases fully to a vertical finish alignment (picture 4).
From this view we can see how the golfer is doing a relative job of staying in posture until the front leg is
posted in picture (2). As the front leg posts up the head begins to move upward as can be seen in picture
(2). Then as the stroke moves into the full extension (3) the posture releases more upward. From the full
extension to the finish the posture releases freely into its' vertical alignment.
posted in picture (2). As the front leg posts up the head begins to move upward as can be seen in picture
(2). Then as the stroke moves into the full extension (3) the posture releases more upward. From the full
extension to the finish the posture releases freely into its' vertical alignment.

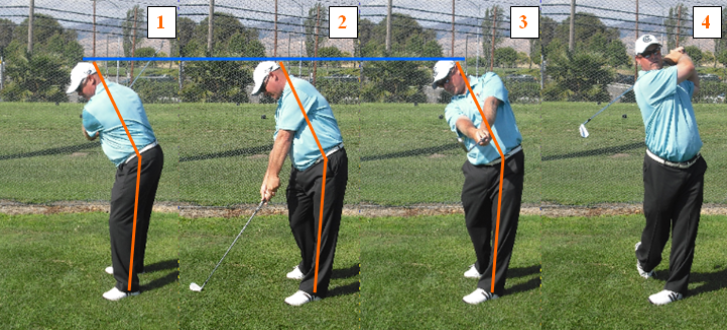
As we Can see with Rotate-In Postural Release actions, the golfer will rotate in posture until the full extension
is completed at some point past waist-high in the follow-through. To rotate in posture for this long interval
the golfer's front leg straightens and leans rearward slightly, this allows the lead hip to continue to rotate
around so that the body can continue to rotate in posture. Once the full extension is achieved the golfer
once again release the postural angles to a tall finish alignment.

Arc Management patterns have been around for a long time, all though teachers have used many different terms and
descriptions to convey the message. There are golfers, such as Tom Watson, who have relatively narrow arc as the stroke
Nicklaus that had a very wide arc in the backstroke and a much more narrow one in the down stroke. And, there are golfer
such as Peter Jabobsen who currently use a more inside and deep arc in the backstroke, matched by and inside and deep
arc in the down stroke. They are all valid and they have a lot to do with the golfer's internal rhythm. The way the arc
transitions allows us to load , store, and release the dynamics of the golf shaft with our own particular rhythmic frequency at
work. Thus, when fitting shafts to a golfer's stroke we look for shafts that fit their arc management patterns.
| Narrow-Wide Arc Management Option: |
In the sequence to the left we see a golfer performing a backstroke that used
an early set with a quite vertical takeaway. This produced a narrow arc in the
backstroke. In the down stroke the arc has widened. This is evident in the fact
that the orange arc line appears wider and the blue line, marking the distance
from the sternum to the hands is wider in the down stroke (far right picture)
than it is in the backstroke (far left picture).
| Deep-Deep Arc Management Option: |

| Wide-Narrow Arc Management Option: |

In the above sequence we see a golfer performing a backstroke that moves very wide with
little hinging in the takeaway. In the down stroke the arc narrows as the hands move in
closer to the body. We can see all three arcs narrowing in the down stroke. The clubhead
arc marked by the black line, the hands arc marked by the orange line, and the blue line
marking how far away form the sternum the hands are moving have all shortened in the
down stroke.


| | | | | | |
| | | |
| | |
Power Golf
B I O M E C H A N I C S
Related To The Fundamentals of Good Feel
3
To purchase a full color eBook
click on the PayPal button below.
Remember to provide email
address. ebooks emailed within 48
hours of purchase.
click on the PayPal button below.
Remember to provide email
address. ebooks emailed within 48
hours of purchase.
To purchase a full color eBook
click on the PayPal button below.
Remember to provide email
address. ebooks are emailed
within 48 hours of purchase.
click on the PayPal button below.
Remember to provide email
address. ebooks are emailed
within 48 hours of purchase.

As a reminder, the Power of 3 Golf Biomechanics related to Good Feel:
Swing Linkage – Impact Linkage - Addresses the options of geometrically aligning arm swing & body
biomechanics.
Swing Slotting - Delivery Plane - Addresses the 3 options of matching the arm swing delivery plane with the
dominant body/core action.
Postural Release – Addresses the 3 options of releasing postural angles so that the body and arm swing match up
during the delivery action.
Arc Management – Addresses the 3 options of rhythmically blending the arm swing action with body action.
As mentioned above there are 3 options for each feature. The options for the
biomechanics related to the fundamentals of power are listed below.
Power of 3 Golf Biomechanics related to Good Feel:
Swing Linkage - Impact Linkage – Front, Center, & Rear
Swing Slotting - Delivery Plane – Down Slotting (Hip-Plane Slot), Cross-Slotting (Torso-
Plane Slot), & Plane-Slotting (Shoulder-Plane Slot)
Postural Release – Stand-Up, Post-Up, & Rotate-In
Arc Management – Narrow-Wide, Deep-Deep, & Wide-Narrow
Keep in mind these descriptions are offered as a general overview. For further
explanations, ways of testing your body mechanics, and to study applications you can
study the Secrets of Owning Your Swing book series.
explanations, ways of testing your body mechanics, and to study applications you can
study the Secrets of Owning Your Swing book series.
On this page we will overview the 4 Biomechanical features related to Good Feel, and that means we will be
addressing the 4 structural influences that relate to blending the body features with the arm swing feature. Study
these features and familiarize yourself with the 3 options related to each feature. Simply familiarize yourself with the
basic patterns. If you are interested in studying them in more detail you can purchase the Secrets Of Owning Your
Swing book series. That series discusses the topics in more detail and includes was of screening and applying the
information learned through the screenings. You can also click on the BioSwing Dynamics logo in the top left corner
of this page to get to the BioSwing Dynamics page which has more information about biomechanics and your golf
swing.
The Post-Up Postural Release option is used by golfers that own the Side-On Trail Arm Action. These golfers extend downward
and outward at a 45 degree angle past impact. Therefore they need to make less room than the On-Top golfer, however they
still need to make a moderate amount of room. The Post-Up Postural Release option allows the Side-On golfer to make the
room necessary for the Cornering Lever Delivery action they perform.
The Rotate-In Postural Release option is used by golfers that own the Under Trail Arm Action. These golfers retain their levered
angles longer and extend more outward. Therefore they need to rotate in posture through impact in order to facilitate the
clubhead getting back to the ball. The Rotate-In Postural Release option allows the Under golfer to delivery the clubhead to the
ball while using the Extendinging Lever Delivery action.


MAKING YOUR GOLF SIMPLE APP IS AVAILABLE - CLICK ON THE PICTURE BELOW FOR MORE DETAILS: